Profile
Showing posts with label Zlata M. Show all posts
Showing posts with label Zlata M. Show all posts
Wednesday, November 13, 2019
The Winter Is Coming

♥Scrap Kit & Tube♥
Gorjuss winter tube "Eliza" by Zlata M
Scrap Kit Winter wonderland by Tiny Turtle Designs
♦Font♦
Dayling

Monday, February 10, 2014
I love you

♥Supplies♥
I used the Xenia tube of Zlata M Here
Scrap kit used Monkey Love By Bibi Collections Here
Template 236 by Kristin, you can download it on her blog Here
♦Filter♦
Eye Candy 4 - Gradient Glow
Xero - Fritillary
Unplugged X - Interlace
Dsb Flux - bright noise - spider web
◄Font►
Lainie Day
Let's start!
Open template and press shift +D to duplicate the template and close the original.
Make raster 9 active and open paper 4 and paste as a new layer.
Go to effects- xero - fritillary
with these settings:
2- 30 -10- 25
Add some bright noise to is as well
with these settings:
Intensity: 30 Darker
Add some gradient glow in red in 3.00 size on glow
add some bright noise to it as well.
Make copy of raster 9 active and open paper 4 and paste as a new layer.
Go to effects- xero - fritillary
with these settings:
2- 30 -10- 25
Add some bright noise to is as well
with these settings:
Intensity: 30 Darker
Add some gradient glow in red in 3.00 size on glow
add some bright noise to it as well.
Make raster 7 active and open paper 2 and paste as a new layer.
Go to effect - unplugged x - interlace
with these settings:
1- 50 - 50 - 1 - 0 - 50
Add some gradient glow in brown in 3.00 size on glow
add some bright noise to it as well.
Make copy of raster 7 active and open paper 2 and paste as a new layer.
Go to effect - unplugged x - interlace
with these settings:
1- 50 - 50 - 1 - 0 - 50
Add some gradient glow in brown in 3.00 size on glow
add some bright noise to it as well.
Make raster 8 active and open paper 3 and paste as a new layer.
Go to effects- dsb flux- spider web
with thses settings:
4 - 73 - 64
Add some gradient glow in brown in 3.00 size on glow
add some bright noise to it as well.
Make copy of raster 8 active and open paper 3 and paste as a new layer.
Go to effects- dsb flux- spider web
with thses settings:
4 - 73 - 64
Add some gradient glow in brown in 3.00 size on glow
add some bright noise to it as well.
Make raster 4 active and open paper 7 and paste as a new layer.
Add some gradient glow in brown in 3.00 size on glow
add some bright noise to it as well.
Make copy of raster 4 active and open paper 7 and paste as a new layer.
Add some gradient glow in brown in 3.00 size on glow
add some bright noise to it as well.
Make raster 3 active and open paper 10 and paste as a new layer.
Go to effects- xero - fritillary
with these settings:
2- 30 -10- 25
Add some bright noise to is as well
with these settings:
Intensity: 30 Darker
Add some gradient glow in red in 3.00 size on glow
add some bright noise to it as well.
Make copy of raster 3 active and open paper 10 and paste as a new layer.
Go to effects- xero - fritillary
with these settings:
2- 30 -10- 25
Add some bright noise to is as well
with these settings:
Intensity: 30 Darker
Add some gradient glow in red in 3.00 size on glow
add some bright noise to it as well.
Make promoted selection layer active and add a new raster layer, flood fill with black.
Open close up of choice and paste as a new layer. Go to properities - luminance legacy.
go to properties again this time choose screen.
then go to your unplugged x plugins and find interlace
with these settings:
1- 50 - 50 - 1 - 0 - 50
Go to effects - xero - radience
with these settings:
128 - 50 - 128 - 255
Now add gradient glow and bright noise.
Make raster 6 active and add a new raster layer, flood fill with black.
Open close up of choice and paste as a new layer. Go to properities - luminance legacy.
go to properties again this time choose screen.
then go to your unplugged x plugins and find interlace
with these settings:
1- 50 - 50 - 1 - 0 - 50
Go to effects - xero - radience
with these settings:
128 - 50 - 128 - 255
Now add gradient glow and bright noise.
Make raster 5 active and open paper 2 and paste as a new layer.
Go to effect - unplugged x - interlace
with these settings:
1- 50 - 50 - 1 - 0 - 50
←Elements→
Open element 17 and paste it as a new layer.
Open element 95 and paste it behind the frame.
duplicate and flip, use your freehand selection tool and remove pieces that sticks out behind the frame.
Open element 100 and paste it behind the frame on the lfet side, duplicate and mirror.
Open element 15 and paste it on the right side on you tag.
Open element 18 and paste it behind the boxes.
Open element 11 and paste it on top of the boxes.
Open element 14 and paste it in fornt of the window.
Open element 16 and paste it were you want it.
Open element 10 and paste it were you want it.
Open element 19 and paste it as a new layer on top of raster 6.
Open element 44 and paste it behind you tag.
Open element 66 and paste it were you want it.
add gradient glow to it.

Add your tube of choice, copyright and name!
Friday, October 25, 2013
Drama Llama

*~Supplies Needed~*
Tube of choice i used the gorjuss art of Zlata M you can get the tubes Here
Scrap kit used Drama Llama by Bibi Collection you can find her amazing kits Here
Template used template 72 by Millie, you can download it on her blog Here
*~Filter Used~*
Eye Candy 4 - Gradient Glow
Dsb Flux - Bright Noise
*~Font i used~*
Apantasia
Let us start!
Open template and press shift + D to duplicate the template and close the original.
Delete layers 8,7,6 and 5.
Make raster 1 active and open paper 9 and paste as a new layer.
add some gradient glow to it in pink with the settings you prefer.
Then add some bright noise to it so it stands out little.
Make layer 2 active and open paper 11 and paste as a new layer.
add some gradient glow to it in pink with the settings you prefer.
Then add some bright noise to it so it stands out little.
Make layer 3 active and open paper 5 and paste as a new layer.
add some gradient glow to it in pink with the settings you prefer.
Then add some bright noise to it so it stands out little.
Make layer 4 active and open paper 4 and paste as a new layer.
add some gradient glow to it in pink with the settings you prefer.
Then add some bright noise to it so it stands out little.
Open tube of choice and paste as a new layer on top of raster 4.
~*Elements*~
Open element 13 and paste in the back of your tag, duplicate and move around until you
get the result you are looking for.
Open element 25 and paste as a new layer on top of layer 4 to the left.
Open element 30 and paste it to the back of your tag, duplicate and mirror until you get it
as you want.
Open element 42 and paste it on to raster 4 dulpicate and mirror, and duplicate and mirror again.
Open element 46 and paste on to the tube layer.
Open element 48 and paste it were you want it.
Open element 52 and resize to fit back of your tag, duplicate and flip it.
Open element 61 and paste as a new layer, duplicate and mirror...
Open element 62 and paste on to the tube layer to the left.
Open element 79 and paste as a new layer were you want it.
Add copyright, tagname and we are done!

Written By Mel 25th Oct 2013
Saturday, August 18, 2012
Homework

*~Supplies Needed~*
Tube of choice i am using the art of Zlata M you can buy Here
(Please do not use this tube without a license to do so!!!)
Scrap Kit used "Total Rebel" By Toxic Desirez you can find the kit Here
Template 174 By Kristin Here
Mask of choice i used mask CMC-LinesGrids-mask1 by Kristin Here
*~Filter Used~*
Xero
Unplugged X
EyeCandy4000
L & K Zitah
*~Font Used~*
Fely
Let us Start!
Open up the template shift + d to duplicate it and close out the original.
Make top grey rectangle active then mark
go to Xero - fritalliry
with these settings: 7-30-12-39
Make bottom grey rectangle active then mark
go to Xero - fritalliry
with these settings: 7-30-12-39
Make top maroon rectangle active then mark
and open paper 9 and paste as a new layer.
Make bottom maroon rectangle active then mark
and open paper 9 and paste as a new layer.
Make top pink cirlce active mark and open
paper 7 and paste as a new layer.
Make bottom pink cirlce active mark and open
paper 7 and paste as a new layer.
Make top blue rectangle active then mark and open
paper 14 and paste as a new layer.
Make bottom blue rectangle active then mark and open
paper 14 and paste as a new layer.
Make balck round rectangle active, mark and open tube of choice and
paste as a new layer. Use your moving tool to get it were you want it.
Invert and delete, duplicate and mirror.
Duplicate both tube layers again so you have two of both of them.
Go to orginal tube layer 1 and go to properties - luminance legacy
then make orginal tube layer 2 active and go to properties - screen
Go to duplicated tube layer 1 and go to properties - luminance legacy
then make dupøicated tube layer 2 active and go to properties - screen
Go make black round rectangle active and go to
xero-fritillary
with these settings: 7-30-12-39
Now go to top orginal tube layer
then to unlpugged x - interlace
with these settings: 1-50-50-1-0-50
Then go to top duplicated tube layer
then to unlpugged x - interlace
with these settings: 1-50-50-1-0-50
Then do this to both top tube layers
go to L and K Zitah
With these settings: 5-33-37-47-69-66-57-32
Now make black circle active then mark and open paper 4
and paste as a new layer.
Now go back and add drop shadow to all the template layers i you did not do it already!
Take film strip and paste it behind the black round rectangle layer
duplicate and flip.
Open sparkles and paste as a new layer on top of the tube layers.
Open frame 2 and paste as a new layer on top of cirlce layer.
Open tube of choice and paste as a new layer on top of circle layer
duplicate and move on top of frame 2.
Use your free hand tool and remove parts of the tubes you do not
want there so it looks like the girl is standing inside frame 2.
Put on some radience if you want to.
Open element flame and paste on top of top and bottom
grey rectangle, duplicate as many times you like
move and flip. i decided at this point to remove both
top and bottom grey rectangles it looked so much better
with only the silver flames=)
Now make background layer active and flood fill with black,
choose a mask and add.
Then add a new reaster layer and flood fill with a light grey color
go to dbs flux- bright noise
these settings: lighter 47
and add the same mask.
then duplicate the black mask layer and mirror it and move both black
mask layer under the silver grey one.
Then add your signature,copyright and we
are done☺

Written by Mel 18 Aug 2012
Saturday, May 26, 2012
Eat Your Heart Out

*~Supplies Needed~*
Tube of choice I am using art Zlata M of you can find the tube Here
Scrap kit used is "Rogue" by Bibi you can find her kits Here
Finish this tag Template by Missy
Mask of choice
*~Filter Used~*
Xero
Eyecandy4000
Dbs flux
Let us Start!
Open up the template shift +d to duplicate it close out the original.
Delete layer "glittered gradient star"
Start off with layer "glittered rectangle left" go to new layer - adjustment layer - hue/saturation/lightness
with these settings: hue: 40 saturation: 0 lightness: -24
Move up to "glittered rectangle right" and do again as you did above.
new layer - adjustment layer - hue/saturation/lightness
with these settings: hue: 40 saturation: 0 lightness: -24
Now move up to "rectangle left" and mark and open paper 11 and add as a new layer - invert and delete.
and now "rectangle right"
Go to "rectangle center" and new layer - adjustment layer - hue/saturation/lightness
with these settings: hue: 40 saturation: 0 lightness: -24
Small left & right circle layer do this new layer - adjustment layer - hue/saturation/lightness
with these settings: hue: 40 saturation: 0 lightness: -24
*Then go to plugins- dbs flux- bright noise
With these settings: intensity: 18 Darker
again go to plugins- xero - fritillary
With these settings: 3 - 30 - 7 - 19
Go to layer "glitter rectangle 1" make it black then go to
plugins - dbs flux
With these settings: intesity: 23 Lighter
No move up to "rectangle center 2" and mark and open paper 11
add as a new layer - invert and delete.
Go to layer "rectangle with glitter" and new layer - adjustment layer - hue/saturation/lightness
with these settings: hue: 40 saturation: 0 lightness: -24
Now move up to "circle 1 center mark and open paper 11
Now layer "glittered circle center" mark and add a new raster layer and flood fill with red and go to plugins - dbs flux
With these settings: Intensity: 25 Darker
Now move to "dotted circle center" and go to layers - new adjustment layer - hue/saturation/lightness
With these settings: Hue: 40 Saturation: 0 Lightness: 24
Now open up your close up tube of choice and mark layer "circle 2 center" and paste it as a new layer invert and delete.
Duplicate the close up layer and close the duplicated layer. Then right click and go to properties and choose - Luminance legacy
then open up the closed off duplicated layer and go to plugins - xero - radience
With these settings: 128 - 50 - 128 - 255
Now open element 9 and paste it as a new layer on rectangle left and rectangle right"
open element 44 and paste it on top of rectangle center 2.
open element 39 and paste on to the star layers, both of them.
open element 28 and paste on to of large circle layer.
open element 16 and paste on to small circle layers, duplicate and mirror.
open element 43 and paste on layer rectangle with glitter.
paste apple and piaono element in the bottom of that.
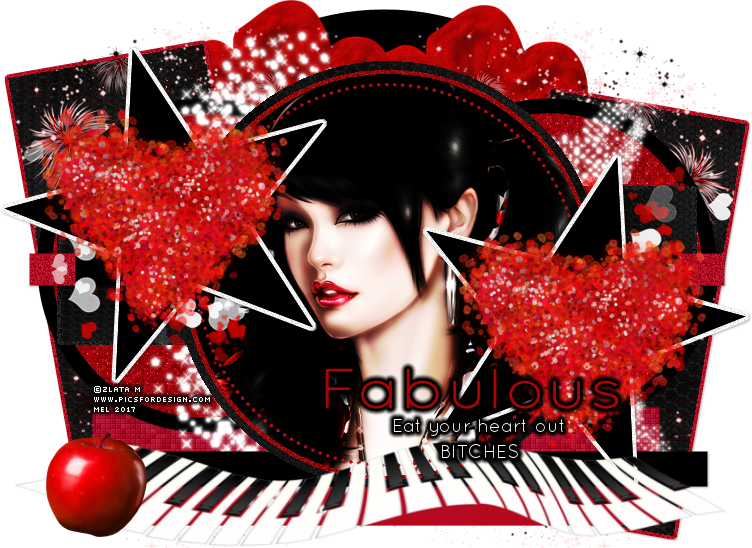
Written by Mel 26 May 2012
Wednesday, May 23, 2012
Scarlet Shoes

*~Supplies Needed~*
Template 5 by Tracey (blog is not active anymore)
Tube of chocie, i used "Scarlet Shoes" by Zlata M you can find it HERE
Scrap Kit i used is "Amore" by Bibi 's Collection
*~Filter Used~*
VanDerLee - Unplugged X - Interlace
Eyecandy 4000 - Gradient Glow
*~Font i used~*
Saginaw
Let Us Start!
Open up the template in psp, then hit SHIFT+ D to duplicate
and close the original..
Then you delete the © on the template
and delete the text and text fill layers as well.
and at last delete square 3, square fill 3, square 2, square fill 2 and square 1
then you should only have the layers left that we are going to use...
Now move down to the layer called "rectangle 1" and view only that one
choose your magic wand tool and press right outside the rectangle,
then open up "papers 5" and paste as a new layer
make sure you go the right settings then press CTRL + X
Now you should have filled the rectangle with the paper.
now you go to Effects - Plugins - VanDerLee - Unplugged X vs.2 - Interlace
With these settings
1 - 50 - 50 - 1 - 0 - 50
Transparency - 0 Normal
Then you go to the layer called " rectangle"
and choose your magic want tool again and press right outside the rectangle.
add a new raster layer and floodfill with color of choice i used white.
Open up the close up of the tube you want to use, resize and paste it as a new layer
then use your moving tool to put inside the "rectangle"
Duplicate the close up layer and close off the duplicated one.
the go to Adjust - Blur - Gausian Blur - Radius 3,0
And then go to Properties - Luminance Legacy
Now go to the duplicated close up layer and choose properties
With these settings
Properties - Screen
Opacity: 85
Open element 19 "the light pink glass heart"
Resize to 50%
mark the "rectangle 1" layer and paste the heart on the middle of side of the
corner duplicate and mirror,
Then you open element 13 "the bee mine heart"
resize and paste it in top of the glass hearts.
Now we are almost done (^^,)
Mark the last heart layers and use eyecandy 4000 - Gradient glow
With these settings
Glow Width: 5.00
Soft Corners: 25
Overall Opacity: 100
Now take your tube of choice and place it were you want it and add
© and name and word art of choice to it
Open up your "saginaw" font or font of choice and write
"Beauty is in the eye of the beholder" or whatever you like to write
I hope you enjoyed my tutorial!
(This is a old tutorial so items may not be avaiable for download)
Used for inspiration☺

WRITTEN BY MEL 7 APRIL 2012
I Kissed A Girl

*~Supplies needed~*
Tube of choice im using the exclusive tube of Zlata M
(please dont use this tube without the proper license to do so.)
Scrap Kit "SweetKisses" by Bibi you can find Here
Template by Deb & Kristin collab 2011 template 2
*~Filter Used~*
Eyecandy4000
Xero
Dbs Flux
Unplugged X
*~Font Used~*
Black Bloc
Let Us Start!
Open up the template shift +d to duplicate it close out the original.
Delete "heart" layer and "raster 2 " layer.
Start with "black right rectangle" mark with your magic wand tool, open paper 8 resize to 60% and paste as new layer use your moving tool to get it were you want - invert and delete and merge down.
Now go to plugins - Unplugged x - TV RGB
With these settings: -Normal - Trancparency : 0
Then move to "black left rectangle" mark with your magic wand tool, open paper 8 resize to 60% and paste as new layer use your moving tool to get it were you want - invert and delete and merge down.
Now go to plugins - Unplugged x - TV RGB
With these settings: -Normal - Trancparency : 0
Then you go to layer " grey left circle" mark it with your mwt and open paper 9 resize to 60% and paste as new layer - invert and delete and merge down.
Then go to plugins - xero - artworks
With these settings:
Wedges
57- 34- 8- 192- 6 - 1 - 15- 20-
220-255
Do the same as above to "grey right circle"
Move up to "teal left circle" and open paper 1 mark it with your mwt and open paper 9 resize to 60% and paste as new layer - invert and delete and merge down.
Then go to plugins - xero - artworks
With these settings:
Wedges
57- 34- 8- 192- 6 - 1 - 15- 20-
220-255
Do the same as above to "teal right circle"
Now go to layer " pink left rectangle" mark it with your mwt and open paper 8 resize to 60% and paste as new layer - invert and delete and merge down.
to plugins - Unplugged x - TV RGB
With these settings: -Normal - Trancparency : 0
do the same to "pink right rectangle"
No go to "oval" and mark it and flood fill with black.
Then you mark the layer "oval" open up your close up tube and paste it as a new layer.
Then go to plugins - xero - radience
With these settings: 26 - 1 - 57 - 244
Then you go back to the oval layer, duplicate it and have the duplicated layer marked and choose a color from the kit and go to plugins - dbs flux - spider web
With these settings: 25 - 44 - 39
then set the colored duplicated layer opacity to 44
and the oval layer to opacity 64
to layer "copy of raster" and mark it and add a new raster layer choose another color from the kit and flood fill it.
then go to plugins - dbs flux - spider web
With these settings: 25 - 44 - 39
set the opacity of the duplicated colored layer 52
and the "copy of rater" 62
"do the same to the "raster 3"
Then to layers "copy of vector" and copy (2) of vector" flood fill with black.
then set the opacity to 60 on layers "copy of vector" and copy (2) of vector"
~*Elements*~
~*Elements*~
Now open element 69 resize to 53% and paste as a new layer on "pink left rectangle" layer.
then open element 70 and resize to 53% and paste as a new layer on "pink left rectangle" layer then flip it.
Open element 104 and paste it as a new selection under oval layer.
then open element 11 and paste as a new layer behind the close up, then open element 13 and do the same and flip it.
Then open element 2 and paste it behind the tube little bit higher so it shows on the outside, duplicate and mirror it.
Now go to the bottom layer and open element 21 and paste it as you like.
Open element 87 and paste it on top of closeup layer on the bottom of the frame.
Then open element 57 and resize it to 40% and paste it were you want it.
Open element 31 and resize to 78% and paste it were you like it.
Add the tube you have choosen were you want it.
Then add name and copyright and we are done :o)
I hope you enjoyed my tutorial!

Written By Mel 23 May 2012
Saturday, May 12, 2012
V.i.p. Princess

*~Supplies Needed~*
Tube of choice i used the gorjuss art of Zlata M Here
Template by Kristin you can find her templates Here
Scrap kit i used is the colorful kit "Emo Princess" by Bibi Here
Mask of choice
*~Font Used~*
Aerofoil
*~Filter Used~*
Eyecandy4000
Unplugged X
Let Us Start!
Open up template shift+d and close the original
open up a new canvas 600 x 600 and floodfill with a color from the kit i used black,
mark layer "raster1" and paste the finished product of your mask on to there.
Now go to "Purple Rectangle 1" mark and open paper 5 add as new layer - invert and delete and merge down.
Now go to "Purple Rectangle 2" and repeat the step you did before: mark and open paper 5 add as new layer - invert and delete and merge down.
Next go to pink rectangle 1 and mark and open paper 11 add as new layer - invert and delete and merge down.
now go to pink rectangle 2 and do the same : add as new layer - invert and delete and merge down.
Now go to the layer Rectangle open paper 11 add as new layer - invert and delete and merge down.
Both layers Dotted Rectangle 1 and 2 make them light grey..
Go to the rectangle layer and open paper 2 and paste as new layer invert and merge down.
now go to effects - plugins - vander lee - unplugged x - interlace
with these settings:
1 - 50 - 50 - 1- 0 - 50- transparency: 0 Normal
Now go to layer "glitter circle" and make it blue to fit the kit.
Move down to circle and mark it add a new raster layer and floodfill with white.
merge down and mark again and open up close up tube of choice and paste as a new layer use your moving tool to get it as you want.
and invert and delete and duplicate. close the duplicated layer and go to adjust -blur and gaussian blur
with these settings: 2,00
then go to properties and chooce luminance legacy.
now open the duplicated layer and go to properties and set thescreen opacity to: 90
Go to effects - plugins - vander lee - unplugged x - interlace
with these settings:
1 - 50 - 50 - 1- 0 - 50- transparency: 0 Screen
Delete the word art layers.
Delete both think black rectangle layers.
open up element 10 and go to layer rectangle and paste as new layer -duplicate and mirror
open up element 11 and go to layer rectangle and paste as new layer - duplicate and mirror
open element 14 and paste it as a new selection behind the big circle duplicate and flip.
open element 26 resize to 70% and paste it behind the circle on borth side of it.
open element 55 resize to 77% i paste it in evey corner of the back of the tag.
open element 60 resize to 60% and past on to as new selection on rectangle layer on both sides so duplicate and mirror. duplicate again and flip and again and mirror.
open element 61 paste on glitter circle layer duplicate and mirror and merge down and go to effects- plugins - eyecandy4000 - gradient glow color white
with these settings :
glow width: 7.00 Soft corners: 25 Overall opacity: 94
now paste the tube were you want it now add your word art of choice, copyright and name and we are done!
I hope you enjoyed my tutorial☺

Written By Mel 12 May 2012
Sunday, November 6, 2011
Zlata Confidence

*~Supplies needed~*
I used the great art of Zlata M you can find the tube Here
Texture of choice - you can find lots with a google search or deviant
Animation i used Globbysparklies by Missy you can download from her blog Here
*~Filter Used~*
Eyecandy 4000
Alien Skin-Xenofex 2- Consellation
Vanderlee Unplugged X
*~Font Used~*
Lainie Day
Lainie Day
Let Us Start!
Open New Canvas 650 x 250
Open up your texture of choice and press shift + D so you get a copy of it and close
the original. Resize to fit your canvas 650 X 250
Open up you tube of choice and place it to the right then duplicate
it and mirror so you get the close up in both ends of the canvas like this

Now merge both close up layers, and duplicate again,
go to original close up layer and
Adjust - Blur - Gaussian Blur
Radius 2,0
Now go to the duplicated close up layer and
choose properties blend mod - Hard Light
Go to your texture layer and effects - UnPlugged X -Interlace
With these settings
1- 50 - 50 - 1 - 0 - 50
Transparency 0
Normal
Go back to the top close up layer and merge the two close up layers down
then go back to Unplugged X this time we will use Deinterlace
With these settings
70 - 10 - 60
Transparency 0
Normal
Then back to the close up layer again, then effects
Unplugged X - Interlace with the same settings as before
1- 50 - 50 - 1 - 0 - 50
Transparency 0
Normal
open up the main tube resize as you like and paste in the middle
of the canvas...
Now You should have something like this

Now find your font of choice and write
"Confidence is what makes a girl sexy"
on top to both left and right for the main tube..
(but be sure that you have marked the layer behind the main tube)
When you have what you want go to
effects Eyecandy 4000 - Gradient Glow
choose a color from your tube
With These Settings
Glow Width - 3.0
Soft Corners - 25%
Overall Opacity - 100
Now hit the pen tool
set your foreground color to black and background color to
I used the Dash Dot line, choose the setting that fits your likings
i used default settings
Now add the chosen line
both over and under your text
now you should have something like this

If you got the layers behind the main tube as you like
merge them all down and add copyright info..
Close off you tube layer
Copy Merged
and paste as a new image
Add border
settings: 3
color of choice
i used black
Now open you animation shop
Copy the merged layer and paste as a new animation
in animation shop
now open up your animation of choice
i used Globbysparklies by Missy
resize the animation to fit your canvas if it is to big
duplicated your tag into as many frames as the animation
you will use have.
Then highlight your animation and select all frames
then copy and choose your tag frame and select all frames then
paste into selected frames.. (paste it in the middle)
test your animation if it looks right
go back to your psp and copy your main tube of choice
then paste as a new animation into animation shop
now remember to duplicate it into the same amount as your
other frame Then highlight - select all frames
then copy and choose your tag frame and select all frames then
paste into selected frames.. (paste it in the middle)
Now test your animation and if it looks right to you
go back to psp and choose your font of choice
write your name
When you have what you want go to
effects Eyecandy 4000 - Gradient Glow
choose a color from your tube
With These Settings
Glow Width - 3.0
Soft Corners - 25%
Overall Opacity - 100
Now copy and go back to animation shop
paste as new animation.
remember to duplicate it into the same amount as your
other frame Then highlight - select all frames
then copy and choose your tag frame and select all frames then
paste into selected frames..
place it were you want.
Now you are done, i hope you enjoyed
my tutorial ☺
Wednesday, July 29, 2009
Glamorous

Tag Show Off!

Subscribe to:
Posts
(Atom)