Followers
Profile
My Licenses
Arthur Crowe-AC128
Ami-AMIMEL
BarbaraJensen-BJ1551
Cdo-Cdo-2090
Celine-CP1764MEL
Cilm-CI3927LM
CreativeMisfits-CM-213MA
DannyLee-DL0014
DreamscapeImaging-DSI780
EliasChatzoudis-EAS11359
Gorjuss-SW2251
Help4CAsper-CAS029MA
KeithGarvey-KG1057
MyPspTubes-MPT8644
PicsForDesign-PFD_MEL
Pte-PTE0758
RachaelTallamy-011066MEL
RomanZaric-RZ083
Satc-SATC0096
TheHunter-APSS0144
ThePspProject-TPP00144
TooshToosh-Toosh1365
TonyTzanoukakis-TTZ115
Verymany-VMT_MEL
VmArtists-VMA_MEL
Xeracx-IRM015A
UYA-UpYourArt3406
ZindyZone-ZZT1089
ZlataMac-ZLATAM_Mel
Wednesday, March 19, 2014
Independent woman
♥Supplies♥
Tube of choice i used the gorjuss art of ViNina Here
Scrapkit used Rossys Violin By Bibi Collection Here
Template used ccindependent by Crazy Cakes
♦Filter♦
Eye Candy 4 - Gradient Glow
Penta.com - Color Dot
Dsb Flux - Bright Noise
◄Font►
Billion Stars
Let's start!
Open template press shift + D to duplicate the template and close the original.
Delete layer 1 and 2.
Make layer 8 active and go to Layers- New Adjustment Layer - Hue/Saturation/Lightness
with these settings: Hue: 60 Saturation: 0 Lightness: 20
and then add some bright noise to it as well with these settings: Intensity: 44 Mix
Make layer 7 active and open paper 10 and paste as a new layer.
Go to effects - plugins - penta.com - color dot
with the settings:
Value: 90
Distance: 2
Color R 255
Color G: 255
Color B : 255)
Add some gradient glow in black to match your kit (Glow witdh:3.00)
and then add some bright noise to it as well
with these settings: Intensity: 44 Mix
Make layer 6 active and open paper 4 and paste as a new layer.
Go to effects - plugins - penta.com - jeans
( amount: 62 borders width: 4)
Add some gradient glow in black to match your kit (Glow witdh:3.00)
and then add some bright noise to it as well
with these settings: Intensity: 44 Mix
Make layer 5 active and open paper 10 and paste as a new layer.
Go to effects - plugins - penta.com - color dot
with the settings:
Value: 90
Distance: 2
Color R 255
Color G: 255
Color B : 255
Add some gradient glow in black to match your kit (Glow witdh:3.00)
and then add some bright noise to it as well
with these settings: Intensity: 44 Mix
Make layer 4 active and open paper 1 and paste as a new layer.
Go to effects - plugins - penta.com - color dot
with the settings:
Value: 90
Distance: 2
Color R 255
Color G: 255
Color B : 255
Add some gradient glow in black to match your kit (Glow witdh:3.00)
and then add some bright noise to it as well
with these settings: Intensity: 44 Mix
Make raster 3 active and open paper 1 (grey) and paste as a new layer.
Go to effects - plugins - penta.com - color dot
with the settings:
Value: 90
Distance: 2
Color R 255
Color G: 255
Color B : 255)
Add some gradient glow in black to match your kit (Glow witdh:3.00)
and then add some bright noise to it as well
with these settings: Intensity: 44 Mix
Open up your tube and paste is as a new layer.
Make wordart active and go to Layers- New Adjustment Layer - Hue/Saturation/Lightness
with these settings: Hue: 43 Saturation: 0 Lightness: 11
Add some gradient glow in black to match your kit (Glow witdh:3.00)
and then add some bright noise to it as well
with these settings: Intensity: 44 Mix
←Elements→
Open element 19 and paste as a new layer on layer 3.
Open element 15 and paste as a new layr on to layer 4.
Open element 22 and paste as a new layer on top of layer 5.
Open element 4 (shoes) and paste as a new layer.
Open element 28 and paste as a new layer.
Open element 29 and paste as a new layer on top of layer 3.
duplicate and move were you want it.
Open element 34 and paste on top of layer 5 duplicate and move around until you have covered up the whole circle with flowers.
Open element 39 and paste on top of layer 7 duplicate and flip.
Open element 40 and paste over the tube were u want it.
Open element 44 and paste on top of layer 4 and duplicate and move litt bit up.
Open element 5 and paste as a new layer on top of layer 3 on top of black lace.
Open element 55 and paste it were u want it.
Open element 56 and paste it were u want it.
Open element 78 and paste it over the tubes wrist.
And we are done!
Labels:Tutorial,Vi Nina | 0
comments
Monday, March 3, 2014
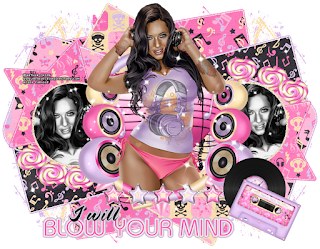
I will blow you mind
♥Supplies♥
Tube Music Love of Arthur Crowe you can get it Here
Scrap kit Muzik Lovr By Toxic Desirez Here
Template used template 234 by Kristin Here
♦Filter♦
Eye Candy 4 - Gradient Glow
Dsb Flux - Bright noise
Xero - Radience
Vandelee - Unplugged X - Interlace
◄Font►
Sick Capital Vice
Let's start!
Open template and press shift + D to duplicate the template and close the original.
Delete raster 10,copy of raster 10 and copy of raster 4.
Make raster 1 active and open paper 9 and paste as a new layer.
Add some gradient glow in white, then add gradient glow again in a color from the kit.
Width: 3.00 Intensity: 35
Add some bright noise to it as well
settings: Intensity: 35 Mix
Now make raster 8 active and open paper 8 and paste as a new layer.
Add some gradient glow in white, then add gradient glow again in a color from the kit.
Width: 3.00 Intensity: 35
Add some bright noise to it as well
settings: Intensity: 35 Mix
Make copy of raster 8 active and open paper 8 and paste as a new layer.
Add some gradient glow in white, then add gradient glow again in a color from the kit.
Width: 3.00 Intensity: 35
Add some bright noise to it as well
settings: Intensity: 35 Mix
Make raster 7 active and open paper 6 and paste as a new layer.
Add some gradient glow in white, then add gradient glow again in a color from the kit.
Width: 3.00 Intensity: 35
Add some bright noise to it as well
settings: Intensity: 35 Mix
Make copy of raster 7 active and open paper 6 and paste as a new layer.
Add some gradient glow in white, then add gradient glow again in a color from the kit.
Width: 3.00 Intensity: 35
Add some bright noise to it as well
settings: Intensity: 35 Mix
Make raster 6 active and open paper 10 and paste as a new layer.
Add some gradient glow in white, then add gradient glow again in a color from the kit.
Width: 3.00 Intensity: 35
Add some bright noise to it as well
settings: Intensity: 35 Mix
Make copy of raster 6 active and open paper 10 and paste as a new layer.
Add some gradient glow in white, then add gradient glow again in a color from the kit.
Width: 3.00 Intensity: 35
Add some bright noise to it as well
settings: Intensity: 35 Mix
Make raster 3 active and open paper 4 and paste as a new layer.
Add some gradient glow in white, then add gradient glow again in a color from the kit.
Width: 3.00 Intensity: 35
Add some bright noise to it as well
settings: Intensity: 35 Mix
Make copy of raster 3 active and open paper 4 and paste as a new layer.
Add some gradient glow in white, then add gradient glow again in a color from the kit.
Width: 3.00 Intensity: 35
Add some bright noise to it as well
settings: Intensity: 35 Mix
Make raster 5 active and add a new raster layer, flood fill with black.
Open close up of tube of choice and resize it to fit into the layer.
Go to properties and add lunimance legacy.
Then add some radience to it
with this settings:
138 - 24 - 88 - 143
Then add some Interlace
with these settings:
1- 26 - 10 - 17 - 5 - 1
transparency: 0
Screen
Add some gradient glow in white, then add gradient glow again in a color from the kit.
Width: 3.00 Intensity: 35
Add some bright noise to it as well
settings: Intensity: 35 Mix
Make promoted selection active and add a new raster layer, flood fill with black.
Open close up of tube of choice and resize it to fit into the layer.
Go to properties and add lunimance legacy.
Then add some radience to it
with this settings:
138 - 24 - 88 - 143
Then add some Interlace
with these settings:
1- 26 - 10 - 17 - 5 - 1
transparency: 0
Screen
Add some gradient glow in white, then add gradient glow again in a color from the kit.
Width: 3.00 Intensity: 35
Add some bright noise to it as well
settings: Intensity: 35 Mix
Make raster 4 active and open paper 3 and paste as a new layer.
Add some gradient glow in white, then add gradient glow again in a color from the kit.
Width: 3.00 Intensity: 35
Add some bright noise to it as well
settings: Intensity: 35 Mix
←Elements→
Open tube of choice and paste as a new layer on top of raster 4 and duplicate and move the duplicated tube layer to the top.
Then use your selection tool and remove the parts that are sticking out behind and in front of frame until you like how it looks.
Open cassatte and rotate with your free rotate tool, rotate to the right by 24,96.
Open splatter and paste as a background behind your tag, duplicate and mirror,duplicate and flip, duplicate and mirror and duplicate, flip.
Open sparkles and paste as a new layer over your tube.
Open record and paste it behind the cassatte.
Open music heart and paste it on top of raster 4.
Open lollipop and paste it were you like it.
Open speakers and paste as a new layer right behind tube on both left and right side.
Open buttons and paste as a new layer on the end of the tubes legs.
Now add copyright and name and we are done!
Labels:Arthur Crowe,Tutorial | 0
comments
Subscribe to:
Posts
(Atom)
Search
Labels
- Alehandra Vanhek
- Alex Prihodko
- Alexander McMillian
- Alfadesire
- Amber
- Andy Cooper
- Anna Liwanag
- Anne Stokes
- Arthur Crowe
- Barbara Jensen
- Brian Gibbs
- CelinArtPinup
- Celine
- Chris Pastel
- Danny Lee
- Dave Nestler
- Di Halim
- Elegance Goldwasser
- Elias Chatzoudis
- Enamorte
- Freebie
- Gorjuss
- Ismael Rac
- Jasmine Becket Griffith
- Jay Trembly
- Jessica Dougherty
- Kamilla Goldwasser
- Keith Garvey
- KiwiFireStorm
- Lady Mishka
- Lysisange
- Marc Duval
- Mariel
- Misticheskaya
- Nocturne
- Robin Mcquay
- Roman Zaric
- Scott Blair
- Screaming Demons
- Skyscraps
- Spazz
- Stella Felice
- The Hunter
- Tooshtoosh
- Tutorial
- Vadis
- Verymany
- Vi Nina
- Vinegar
- Wallpaper
- Wordart
- Zebrush
- Zindy S.D. Nielsen
- Zlata M
Terms Of Use
Please download these from my blogsite only. Do not share the files in emails/groups/blogs etc. If you'd like to use them in a tag tutorial /group challenge - you can do that. But please direct others to my blogsite to download for themselves. And no linking to my download link itself - just the blogsite link, please. Personal use only please don't change any of the scraps or accents (Word art is ok to change color,size) Please do not change the file names or claim as your own, nor re-upload them to any file sharing sites. Thank you for downloading and have fun!


