Profile
Sunday, May 27, 2012
Ice Cream

*~Supplies Needed~*
Tube by Alfadesire of you can find her art Here
Scrap kit used is "Sweet Moments" by Bibi you can find her kits Here
Template by Pink Princess
Mask of choice
*~Filter Used~*
Xero
Unplugged X
Eyecandy4000
Let us Start!
Ok open up the template shift +d to duplicate it close out the original.
Go to layer 7 open paper 3 and paste as a new layer, then go to
Then go to plugins - xero - fritillary
With these settings: 5 - 30 - 10 - 0
Go to layer raster 6 mark and open paper 3 paste as a new layer - invert - delte and merge.
Then go to plugins - xero - fritillary
With these settings: 8 - 30 - 83 - 78
Then go to plugins - eyecandy4000 - gradient glow
With these settings: Glow Width: 4.00 Soft Corners: 25 Overall Opacity: 100
Go to raster 2 open paper 3 and paste as new layer - invert -delete and merge.
Then go to plugins - xero - fritillary
With these settings: 8 - 30 - 83 - 78
Then go to plugins - eyecandy4000 - gradient glow
With these settings: Glow Width: 4.00 Soft Corners: 25 Overall Opacity: 100
mark raster 4 open paper 3 and paste as a new layer,
Then go to plugins - xero - fritillary
With these settings: 8 - 30 - 83 - 78
Then go to plugins - eyecandy4000 - gradient glow
With these settings: Glow Width: 4.00 Soft Corners: 25 Overall Opacity: 100
Then go to the heart layers open paper 3 and add as a new layer.
Now open up your tube of choice and mark layer raste 3 and paste as a new layer.
Then right click the layer, go to properties and choose "Luminance legacy"
Then go to plugins - xero - radience
With these settings: 36 - 9 - 60 - 241
now open element 10 make it purple and paste it on top of layer raster 1.
duplicate and mirror it.
Then open element 21 paste it as a new layer on layer raste 7 and duplicate and mirror it and duplicate and flip it and duplicate and mirror it again.
open element 41 and paste on top of layer 2 and duplicate and mirror it.
opne element 40 and paste it into the heart duplicate and mirror it so it goes directly into both hearts.
then you hide the hearts if that looks better for you.
open element 36 and paste as a new layer on top of all layers.
open element 35 resize to 50% paste also on top of all layers.
open element 23 and paste it on layer raster 1 as a new layer.
Open the tube of choice and paste it to the left in the frame.
Add word art, copyright and name and we are done :)

Written by Mel 27 May 2012
Saturday, May 26, 2012
Beautiful Rihanna

*~Supplies needed~*
Tube of choice im using the fabby work of Danny Lee Here
Scrap kit used "Gold Rush" by Vaybs you can find it Here
Template "simply beautiful" by Brutal Designs you can find her templates Here
*~Filter Used~*
Unlugged X
Eyecandy4000
*~Font Used~*
Saginaw Light
Let Us Start!
Open up the template shift +d to duplicate it close out the original.
go to grey circle bottom and open paper 9 and go to layer - new adjustment layer- hue/saturation/lightness - yellow
with these settings : hue: 13 saturation: 0 Lightness: 28
then mark the circle bottom layer and add paper as a new layer - invert and delete.
then go to effects- plugins - VanDer Lee - Unplugged X - Interlace
With these settings: 1 - 54 - 1 - 1 - 7 - 13 Transparency: 0 Normal
Then go to blk square top mark with your magic wand tool and open paper 20
add as a new layer-invert and delete. do the same to blk square bottom.
then go to layer grey circle top and mark with your mwt and add the face from the tube.
then right click on the tube layer and go to properties and choose luminance legacy.
then duplicate the face tube layer and go to plugins - VanDer Lee - Uplugged x - Interlace
with these settings: 1 - 54 - 1 - 1 - 7 - 13 Transparency: 0 Normal
then merge down, now move up to white circle frame and mark and open paper 9
paste it as a new layer- invert and delete.
View only grey square top, blk square middle and grey square bottom and mark all with your magic wand tool and flood fill the squares with a light grey color.
Take the closeup tube resize it and paste it as a new layer and use your moving tool to get it were you want it, press invert and delete and merge down.
then right click on the tube layer and go to properties and choose luminance legacy.
then duplicate the face tube layer and go to plugins - VanDer Lee - Uplugged x - Interlace
with these settings: 1 - 54 - 1 - 1 - 7 - 13 Transparency: 0 Normal
then mark blk square top, blk square middle and blk square bottom
then open paper 9 again and paste as a new layer- invert and delete and merge.
Then go to plugins- eyecandy400- gradient glow and choose a light grey color to make the frames "pop" more glow width 3.00
~*Elements*~
Open element 22 and go to layer - new adjustment layer- hue/saturation/lightness - yellow
with these settings : hue: 13 saturation: 0 Lightness: 28
paste it at the background layer, duplicate and flip it and move it around as you like. set the opacity on the layer to 52.
Go to the beautiful layer and steal a yellow goldish color from the tube and go to plugins - eyecandy4000 - gradient glow
With these settings: Glow Width: 9.00 Soft Corners: 25
Overall Opacity: 100
Do the same to layer simply.
Now add the tube as a new layer.
Open element 18 and paste it on top of layer blk square top.
Open element 33 resize to 50% and go to
layer - new adjustment layer- hue/saturation/lightness - yellow
with these settings : hue: 13 saturation: 0 Lightness: 28
paste it on top of blk square bottom layer set opacity on layer to 70
den flip it and move it up to blk square top layer
Add copyright and name and you are done!

Written by Mel 26 May 2012
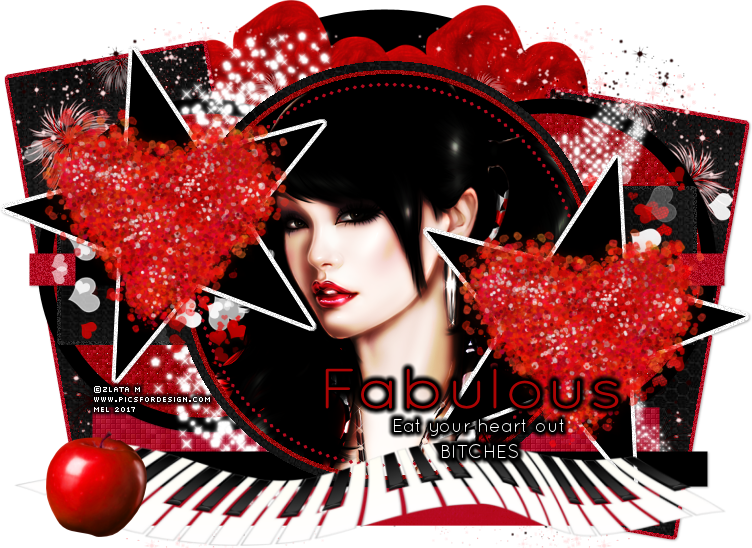
Eat Your Heart Out

*~Supplies Needed~*
Tube of choice I am using art Zlata M of you can find the tube Here
Scrap kit used is "Rogue" by Bibi you can find her kits Here
Finish this tag Template by Missy
Mask of choice
*~Filter Used~*
Xero
Eyecandy4000
Dbs flux
Let us Start!
Open up the template shift +d to duplicate it close out the original.
Delete layer "glittered gradient star"
Start off with layer "glittered rectangle left" go to new layer - adjustment layer - hue/saturation/lightness
with these settings: hue: 40 saturation: 0 lightness: -24
Move up to "glittered rectangle right" and do again as you did above.
new layer - adjustment layer - hue/saturation/lightness
with these settings: hue: 40 saturation: 0 lightness: -24
Now move up to "rectangle left" and mark and open paper 11 and add as a new layer - invert and delete.
and now "rectangle right"
Go to "rectangle center" and new layer - adjustment layer - hue/saturation/lightness
with these settings: hue: 40 saturation: 0 lightness: -24
Small left & right circle layer do this new layer - adjustment layer - hue/saturation/lightness
with these settings: hue: 40 saturation: 0 lightness: -24
*Then go to plugins- dbs flux- bright noise
With these settings: intensity: 18 Darker
again go to plugins- xero - fritillary
With these settings: 3 - 30 - 7 - 19
Go to layer "glitter rectangle 1" make it black then go to
plugins - dbs flux
With these settings: intesity: 23 Lighter
No move up to "rectangle center 2" and mark and open paper 11
add as a new layer - invert and delete.
Go to layer "rectangle with glitter" and new layer - adjustment layer - hue/saturation/lightness
with these settings: hue: 40 saturation: 0 lightness: -24
Now move up to "circle 1 center mark and open paper 11
Now layer "glittered circle center" mark and add a new raster layer and flood fill with red and go to plugins - dbs flux
With these settings: Intensity: 25 Darker
Now move to "dotted circle center" and go to layers - new adjustment layer - hue/saturation/lightness
With these settings: Hue: 40 Saturation: 0 Lightness: 24
Now open up your close up tube of choice and mark layer "circle 2 center" and paste it as a new layer invert and delete.
Duplicate the close up layer and close the duplicated layer. Then right click and go to properties and choose - Luminance legacy
then open up the closed off duplicated layer and go to plugins - xero - radience
With these settings: 128 - 50 - 128 - 255
Now open element 9 and paste it as a new layer on rectangle left and rectangle right"
open element 44 and paste it on top of rectangle center 2.
open element 39 and paste on to the star layers, both of them.
open element 28 and paste on to of large circle layer.
open element 16 and paste on to small circle layers, duplicate and mirror.
open element 43 and paste on layer rectangle with glitter.
paste apple and piaono element in the bottom of that.
Written by Mel 26 May 2012
Wednesday, May 23, 2012
Scarlet Shoes

*~Supplies Needed~*
Template 5 by Tracey (blog is not active anymore)
Tube of chocie, i used "Scarlet Shoes" by Zlata M you can find it HERE
Scrap Kit i used is "Amore" by Bibi 's Collection
*~Filter Used~*
VanDerLee - Unplugged X - Interlace
Eyecandy 4000 - Gradient Glow
*~Font i used~*
Saginaw
Let Us Start!
Open up the template in psp, then hit SHIFT+ D to duplicate
and close the original..
Then you delete the © on the template
and delete the text and text fill layers as well.
and at last delete square 3, square fill 3, square 2, square fill 2 and square 1
then you should only have the layers left that we are going to use...
Now move down to the layer called "rectangle 1" and view only that one
choose your magic wand tool and press right outside the rectangle,
then open up "papers 5" and paste as a new layer
make sure you go the right settings then press CTRL + X
Now you should have filled the rectangle with the paper.
now you go to Effects - Plugins - VanDerLee - Unplugged X vs.2 - Interlace
With these settings
1 - 50 - 50 - 1 - 0 - 50
Transparency - 0 Normal
Then you go to the layer called " rectangle"
and choose your magic want tool again and press right outside the rectangle.
add a new raster layer and floodfill with color of choice i used white.
Open up the close up of the tube you want to use, resize and paste it as a new layer
then use your moving tool to put inside the "rectangle"
Duplicate the close up layer and close off the duplicated one.
the go to Adjust - Blur - Gausian Blur - Radius 3,0
And then go to Properties - Luminance Legacy
Now go to the duplicated close up layer and choose properties
With these settings
Properties - Screen
Opacity: 85
Open element 19 "the light pink glass heart"
Resize to 50%
mark the "rectangle 1" layer and paste the heart on the middle of side of the
corner duplicate and mirror,
Then you open element 13 "the bee mine heart"
resize and paste it in top of the glass hearts.
Now we are almost done (^^,)
Mark the last heart layers and use eyecandy 4000 - Gradient glow
With these settings
Glow Width: 5.00
Soft Corners: 25
Overall Opacity: 100
Now take your tube of choice and place it were you want it and add
© and name and word art of choice to it
Open up your "saginaw" font or font of choice and write
"Beauty is in the eye of the beholder" or whatever you like to write
I hope you enjoyed my tutorial!
(This is a old tutorial so items may not be avaiable for download)
Used for inspiration☺
WRITTEN BY MEL 7 APRIL 2012
I Kissed A Girl

*~Supplies needed~*
Tube of choice im using the exclusive tube of Zlata M
(please dont use this tube without the proper license to do so.)
Scrap Kit "SweetKisses" by Bibi you can find Here
Template by Deb & Kristin collab 2011 template 2
*~Filter Used~*
Eyecandy4000
Xero
Dbs Flux
Unplugged X
*~Font Used~*
Black Bloc
Let Us Start!
Open up the template shift +d to duplicate it close out the original.
Delete "heart" layer and "raster 2 " layer.
Start with "black right rectangle" mark with your magic wand tool, open paper 8 resize to 60% and paste as new layer use your moving tool to get it were you want - invert and delete and merge down.
Now go to plugins - Unplugged x - TV RGB
With these settings: -Normal - Trancparency : 0
Then move to "black left rectangle" mark with your magic wand tool, open paper 8 resize to 60% and paste as new layer use your moving tool to get it were you want - invert and delete and merge down.
Now go to plugins - Unplugged x - TV RGB
With these settings: -Normal - Trancparency : 0
Then you go to layer " grey left circle" mark it with your mwt and open paper 9 resize to 60% and paste as new layer - invert and delete and merge down.
Then go to plugins - xero - artworks
With these settings:
Wedges
57- 34- 8- 192- 6 - 1 - 15- 20-
220-255
Do the same as above to "grey right circle"
Move up to "teal left circle" and open paper 1 mark it with your mwt and open paper 9 resize to 60% and paste as new layer - invert and delete and merge down.
Then go to plugins - xero - artworks
With these settings:
Wedges
57- 34- 8- 192- 6 - 1 - 15- 20-
220-255
Do the same as above to "teal right circle"
Now go to layer " pink left rectangle" mark it with your mwt and open paper 8 resize to 60% and paste as new layer - invert and delete and merge down.
to plugins - Unplugged x - TV RGB
With these settings: -Normal - Trancparency : 0
do the same to "pink right rectangle"
No go to "oval" and mark it and flood fill with black.
Then you mark the layer "oval" open up your close up tube and paste it as a new layer.
Then go to plugins - xero - radience
With these settings: 26 - 1 - 57 - 244
Then you go back to the oval layer, duplicate it and have the duplicated layer marked and choose a color from the kit and go to plugins - dbs flux - spider web
With these settings: 25 - 44 - 39
then set the colored duplicated layer opacity to 44
and the oval layer to opacity 64
to layer "copy of raster" and mark it and add a new raster layer choose another color from the kit and flood fill it.
then go to plugins - dbs flux - spider web
With these settings: 25 - 44 - 39
set the opacity of the duplicated colored layer 52
and the "copy of rater" 62
"do the same to the "raster 3"
Then to layers "copy of vector" and copy (2) of vector" flood fill with black.
then set the opacity to 60 on layers "copy of vector" and copy (2) of vector"
~*Elements*~
~*Elements*~
Now open element 69 resize to 53% and paste as a new layer on "pink left rectangle" layer.
then open element 70 and resize to 53% and paste as a new layer on "pink left rectangle" layer then flip it.
Open element 104 and paste it as a new selection under oval layer.
then open element 11 and paste as a new layer behind the close up, then open element 13 and do the same and flip it.
Then open element 2 and paste it behind the tube little bit higher so it shows on the outside, duplicate and mirror it.
Now go to the bottom layer and open element 21 and paste it as you like.
Open element 87 and paste it on top of closeup layer on the bottom of the frame.
Then open element 57 and resize it to 40% and paste it were you want it.
Open element 31 and resize to 78% and paste it were you like it.
Add the tube you have choosen were you want it.
Then add name and copyright and we are done :o)
I hope you enjoyed my tutorial!

Written By Mel 23 May 2012
Monday, May 21, 2012
My Way Or No Way

First of all i would like to give a biiiiig thanks to Bibi for making this kit for me
i am totally in love with it <3 THANK YOU!
*~Supplies needed~*
I am using the fabby work of The Hunter Here
Scrap kit Curiouz with bright colors from my friend Bibi you can find it Here
Template by Addictive Pleasures (template27) Here
*~Filter Used~*
Unplugged X
*~Font Used~*
Gabriel Weiss Friends
Let Us Start!
Open up the template shift +d to duplicate it close out the original.
Go to layer "rectangle" mark and open paper3 and add as a new layer,
Now move down to the layer "circle" mark with your mwt and open paper6 and paste as a new layer.
Then go to effects - plugins - VanDer Lee - Unplugged X - Interlace
With these settings: 1 - 50 - 50 6 - 95 - 50 - Screen
Now go to layer "word art" then we need to change color to fit the kit so go to layers - new adjustment layer - hue/saturation/lightness
with these settings: hue: 87 saturation: 100 lightness: 0
Now go to the layer "stars" and do the same as "wordart" layer
with thtese settings: hue: 87 saturation: 100 lightness: 0
Then go to "smallstars" layer and again the same
with these settings: hue: 87 saturation: 100 lightness: 0
And at last to the "text" layer as well
with these settings: hue: 87 saturation: 100 lightness: 0
Now open up the close up for the tube you have choosen and add as a new layer on top of "circle" layer" invert and delete. Now duplicate the close up layer and close of the duplicated one.
Then mark the other closeup layer and go to adjust - blur- gaussian blur
with this settings: 2,00
Then right click on the layer and choose properties - luminance legacy.
Mark the duplicated close up layer and go to properties then choose screen.
Now you co to layer "circle" mark, and paste the tube as a new layer, duplicate it and use your mwt to remove and correct so it looks nice inside the circle.
Now you open element 22 and paste it as you want on top of "rectangle" layer.
Open element 8 and paste it on top were you want it.
Now open element 39 and paste it as a new layer behind the tube.
Open element 31 and paste it on top of circle layer, and tube layer.
open element 41 and paste it were you want it.
open element 14 and paste it on top of circle layer under the closeup layer and make the close up layer opacity to 36.
open element 1 resize to 50% and paste it were you want it.
open element 12 and paste it in the left corner of the circle
open element 9 resize 50% flip it, and paste under the element 12
Now add a new raster layer and arrange and move to bottom, then you open element 46 and paste as a new selection on the new raster layer
make it fit the tag and look like a mask effect.
Now Add the copyright and name and your done!
I hope you enjoyed my tutorial!☺

Written by Mel 21 May 2012
Saturday, May 19, 2012
Bad Ass

*~Supplies Needed~*
I am using an exclusive tube of Zebrush you can find her art Here
The Gorjuss kit "BadAzz" from my friend Bibi Here
Template exclusive from Misfits Collabs April & Mzdixi
Mask of choice
*~Filter Used~*
Xero - Fritillary
*~Font Used~*
Black Bloc
Let Us Start!
Open up the template shift +d to duplicate it close out the original
delete these layers on the template before we go any further: crinfo, filmstrip,flimstrip background, rightblckretangle, leftblckretangle, centercircle, Blackoutline...
Ok then you go to layer bigcircle and "view current olny" now you open up
paper 1 (blue and black with writing on) shift +d to duplicate it close out the original resize to 600 x 600 paste as new layer, invert and delete.
Now go to layer rightbaclbg and floodfill with a color to fit your kit and tube i used blue, do the same to leftblaclbg.
then go to effects - plugins - xero - fritillary
with these settings: 4 - 33- 32- 39
Now go to leftrectangle and flood fill with black, do the same to rightrectangle..
then go to effects - plugins - xero - fritillary
with these settings: 4 - 33- 32- 39
Now go to layer innersquare and use your magic wand tool to only mark the border of that layer and flood fill it same blue or color u used on rightbaclbg..
then go to effects - plugins - xero - fritillary
with these settings: 4 - 33- 32- 39
The inside of the innersquare layer flood fill with black.
Open up the tube of choice and paste it were you want it into the innersquare layer, use your moving tool to get it as you want..
duplicate the tube layer and close of the dulpicated one, and go to adjust - blur - gaussian blur
with these settings: 2,00
now you right click on the raste layer and go to properties and choose
Luminance lagacy.
Open up the duplicated tube layer and go to properties and choose luminance..
Then you go to effects - plugins - VanDer Lee - Unplugged X - Inerlace
With these settings: 1- 50 - 50 - 1 - 0 - 50 - Normal
Now you find a lyric or word art you want and write/paste it beside the tube in the innersquare layer.
Now open element 95 and resize to 50% and paste on top of leftrectangle
duplicate and flip, do the same on the rightrectangle.
open element 86 resize 50% and paste it on the bottom of the lyrics.
used gradient glow on it with a blue color
with these settings:
Glow width: 3.00 - Soft Corners: 25 Opacity: 92
open element 76 and paste it on top of bigcircle were you want it to be.
open element 66 and paste it on top of the tag were you want it.
open element 53 resize to 53% and paste it on top of all layers.
open element 42 and resize to 50% and paste it back innersquare-
duplicate it and decorate around the frame..
open up element 94 resize to 30% and paste it were you want it..
Now add copyright and name.
I Hope you enjoyed my tutorial!☺

Written By Mel 19 May 2012
Saturday, May 12, 2012
V.i.p. Princess

*~Supplies Needed~*
Tube of choice i used the gorjuss art of Zlata M Here
Template by Kristin you can find her templates Here
Scrap kit i used is the colorful kit "Emo Princess" by Bibi Here
Mask of choice
*~Font Used~*
Aerofoil
*~Filter Used~*
Eyecandy4000
Unplugged X
Let Us Start!
Open up template shift+d and close the original
open up a new canvas 600 x 600 and floodfill with a color from the kit i used black,
mark layer "raster1" and paste the finished product of your mask on to there.
Now go to "Purple Rectangle 1" mark and open paper 5 add as new layer - invert and delete and merge down.
Now go to "Purple Rectangle 2" and repeat the step you did before: mark and open paper 5 add as new layer - invert and delete and merge down.
Next go to pink rectangle 1 and mark and open paper 11 add as new layer - invert and delete and merge down.
now go to pink rectangle 2 and do the same : add as new layer - invert and delete and merge down.
Now go to the layer Rectangle open paper 11 add as new layer - invert and delete and merge down.
Both layers Dotted Rectangle 1 and 2 make them light grey..
Go to the rectangle layer and open paper 2 and paste as new layer invert and merge down.
now go to effects - plugins - vander lee - unplugged x - interlace
with these settings:
1 - 50 - 50 - 1- 0 - 50- transparency: 0 Normal
Now go to layer "glitter circle" and make it blue to fit the kit.
Move down to circle and mark it add a new raster layer and floodfill with white.
merge down and mark again and open up close up tube of choice and paste as a new layer use your moving tool to get it as you want.
and invert and delete and duplicate. close the duplicated layer and go to adjust -blur and gaussian blur
with these settings: 2,00
then go to properties and chooce luminance legacy.
now open the duplicated layer and go to properties and set thescreen opacity to: 90
Go to effects - plugins - vander lee - unplugged x - interlace
with these settings:
1 - 50 - 50 - 1- 0 - 50- transparency: 0 Screen
Delete the word art layers.
Delete both think black rectangle layers.
open up element 10 and go to layer rectangle and paste as new layer -duplicate and mirror
open up element 11 and go to layer rectangle and paste as new layer - duplicate and mirror
open element 14 and paste it as a new selection behind the big circle duplicate and flip.
open element 26 resize to 70% and paste it behind the circle on borth side of it.
open element 55 resize to 77% i paste it in evey corner of the back of the tag.
open element 60 resize to 60% and past on to as new selection on rectangle layer on both sides so duplicate and mirror. duplicate again and flip and again and mirror.
open element 61 paste on glitter circle layer duplicate and mirror and merge down and go to effects- plugins - eyecandy4000 - gradient glow color white
with these settings :
glow width: 7.00 Soft corners: 25 Overall opacity: 94
now paste the tube were you want it now add your word art of choice, copyright and name and we are done!
I hope you enjoyed my tutorial☺

Written By Mel 12 May 2012
Friday, May 11, 2012
Admit It

*~Supplies Needed~*
Tube of choice i use this gorjuss art of Arthur Crowe Here
Template by CrazyCakes
Scrap kit i used is "Lonely Night" of Bibi you can find it Here
Mask of choice
*~Filter Used~*
Dbs flux
Vander Lee- Unplugged X
Eyecandy4000
*~Font Used~*
914-solid
Adamshand
Let us Start!
Open up template hit shift+d and close the original
Go to layer backcircle and make it blue or purple to fit tube/kit then go to effects - plugins- dbs flux - bright noise settings 20 and mixed
Mark layer "circle" and open up paper 5 and paste as new layer invert and delete.
effects-plugins-VanDer Lee -unplugged x - interlace
With these settings:
1 - 50 - 50 - 1 - 0 - 50 transparency: 0 Normal
Now go to layer "back rectangle" and make it purple to fit the kit.
Go to layer "rectangle" open up the close up of the tube you would like to use and paste as new layer, use your moving tool and move it were you want it, duplicate and hide the duplicated layer.
Go to adjust -blur-gaussian blur
With these settings: 2,00
then go to properties and choose luminance legacy
now open the duplicated layer go to properties - soft light and merge down..
Now go to layer "small rectangle" make it purple or blue to fit the tube/kit
Now go to border layer make it purple or blue to fit the tube/kit
Same with dot layer
Now go back to small rectangle effects-plugins-VanDer Lee -unplugged x - interlace
With these settings:
1 - 50 - 50 - 1 - 0 - 50 transparency: 0 Normal
now open up a new canvas 700 x 700 and use front color from tube or kit no back color
do the same again with black color and mirror mask before pasting it.
then open up mask of choice, when done paste as new layer on top of tag and arrange and move to bottom.
Now open up your tube of choice and paste it were you want it.
I did not use original font and word art but you can if you like:)
Now open element 13 resize to 50% and go to circle layer and paste as you like it,
open element 14 and go to small rectangle and paste it as you like.
open element 22 and paste it to the left on the frame, duplicate and mirror it.
open element 34 resize to 50% go to top frame layer and paste it in the corner over the close up face.
open element 47 and paste it on the layer line were you want it.
open element 50 and paste them to the right on top layer frame, go to effect-plugins-eyecandy 4000 and use gradient glow
With these settings:
White
Glow Width: 9,00
Soft Corners: 25
Opacity: 86
open element 62 resize to 60% and go tol layer rectangle and paste were you want it..
open element 65 resize to 70% and go to layer rectangle and duplicat it mirror it and move it down to under rectangle.
open up element 9 and paste it below rectangle layer on the bottom of the tag
duplicate it and mirror it. Then delete the overflood thats look funny with your freehand tool.
Now add copyright and name and you are done :o)
Hope you enjoyed my tutorial.

Written By Mel 11 May 2012
Tuesday, May 8, 2012
Rebel Rocker

*~Supplies Needed~*
Tube of choice i used the great art of The Hunter Here
Template 156 by Kristin Here
Scrap kit "Black Currant" of Bibi you can find the kit Here
*~Filter Used~*
Xero
Dbs flux
Eyecandy 4000
Let us start!
Open up template shift +d to duplicate it close out the original.
view only "left circle" use your magic wand tool and mark it and open paper 3 and place as a new layer invert and press delete.
open layer left glitter circle and make it black.
open right circle and mark and use paper 3 again
do the same to layer "right glitter circle" as the left.
now open the layer circle and mark and open paper 5 and make it black and grey
paste as new layer invert and delete.
go to rectangle left mark and open paper 5 paste as new layer, invert and delete.
go to effect - plugins - xero - fritillary
With these settings:
5 - 27 - 100 - 60
go to rectangle right mark and open paper 5 paste as new layer, invert and delete.
go to effect - plugins - xero - fritillary
With these settings:
5 - 27 - 100 - 60
Now go to glitter rectangle make it grey
go to layer rectangle 2 and mark paste your close up of chocie as new layer duplicate invert and delete, now go to the top layer you duplicated and use your freehand selection tool and remove the overflood that is outside the frame from her chest and down keep the head outside the frame.
now go to the pixel word layer and delete
go to word art2 layer and make it black and go to effects-plugins- dbs flux- bright noise - lighter
and then you go to effects-plugins and use eyecandy 4000- gradient glow black
now open up element 107 paste as new layer on top of rectangle 2
open element 127 and paste as new layer on sm stars 2 and use your moving tool to move it behind the big rebel text.
open element 126 and paste as new selection on left circle layer and promote to layer
do the same to right circle.
now use gradient glow matching the red in the tag.
open element 76 and paste is as a new layer on rectangle 2
paste your tube were you want it
Now add your copyright and name and your done☺

Written by Mel 8 May 2012
Friday, May 4, 2012
Lil Red Riding Hood

*~Supplies Needed~*
Tube of choice i am using the fabby work of Arthur Crowe Here
Scrap kit "Dark Symphony" from my friend Bibi can be found Here
Template 161 by Kristin Here
*~Filter Used~*
Eyecandy4000
Let us start!
Open up the template shift +d to duplicate it close the original.
delete skull layer and pixel word layer
View only "star background" go to layers new adjustment layer and choose
hue/saturation/lightness
hue -100
saturation -100
in other words make it deep black and merge down.
open up "left circle" and use your wand tool to mark it and open up
paper 4 from the kit and paste as new layer and invert and delete and merge down.
next open "right circle" and use your wand tool to mark it and open up
paper 5 from the kit and paste as new layer -invert and merge.
now open up the "rectangle" use your wand tool again to mark it make it black, and open up element 80 (blood splat) and paste as new layer and duplicate and use your moving tool to get it as you want - invert and delete and merge down.
Now go to "glitter oval" layers- new adjustment layer and hue/saturation/lightness
With these settings:
hue: 30 saturation: 100 lightness:0
merge down..
Now go to the ovel layer and use your magic wand and mark
open up paper 5 and paste as new layer -invert and delete and merge.
go to effects - plugins - VanDer Lee unplugged x - interlace
With these settings :
1-85-24-43-0-50 Normal
Now go to "right glitter rectangle" and layers- new adjustment layer and hue/saturation/lightness with these settings
hue: 0 saturation: -100 lightness: 46
do the same with same settings for "left glitter rectangle" and merge down.
Now go to right rectangle mark and use element 80 again (blood splat)
paste as new layer use your moving tool to get it as you want and invert and delete and merge
do this again with left rectangle.
Now go to gliter circle mark with your magic wand and go to layers
new adjustment layer and hue/saturation/lightness with these settings
hue: 0 saturation: -100 lightness: 46
Now go to circle1 mark with you magic wand tool go to layers- new adjustment layer and hue/saturation/lightness with these settings
hue: 0 saturation: 0 lightness: -100
Now mark circle2 with your wand tool and take the close up of tube you used and paste as a new layer
use your moving tool to get it were you want and invert and delete
duplicate the close up layer
mark the orginal layer and go to adjust - blur-gaussian blur
with these settings Radius: 2,00
now go to properties and choose - luminance legacy
mark the duplicated layer and go to properties - screen
open up element 78 (wire) resize to 70% andpaste as new layer on top of
oval layer.
open up element 2 (butterfly) and mark circle2 and paste as a new layer on top of there. duplicate and mirror merge down.
mark left rectangle layer and open up element 32 (black rose)
resize to 70% and paste as new layer, duplicate and mirror.
merge down and go to effects - plugins - eyecandy 4000 - gradient glow
color dark red.
With these settings :
glow width: 5.00
soft corners : 25
overall opacity: 79
Go to top layer and open up element 57 (spider) resize to 60%
paste were you want it and go to effects - plugins - eyecandy 4000 - gradient glow
color dark red.
With these settings :
glow width: 5.00
soft corners : 25
overall opacity: 79
go to layer circle1 open up element 73 (white heart trail)
and paste as a new layer, duplicate, mirror and merge down.
go to layer left rectangle and open up element 79 (wire) and paste as new selection as you want and promote to layer and do wat you like.
Now go to circle2 and effects - plugins- dbs flux - spider web
With these settings :
Rays: 29
Rings: 44 Merge: 27
Set opacity on layer to 78.
Now add the main tube were you want it, copyright and font of choice.
I hope you enjoyed my tutorial!☺

Written by Mel 4 May 2012
Subscribe to:
Posts
(Atom)